
|
|
|
|
|
|
| home >
jadex > matrix >
matrix tips {-
crystal -} |
|
Matrix Tips
Tips provided in good faith, but no responsibility will be accepted by myself or Autoscribe if you mess up. Applies to all versions prior to Rev 4.
Centre all of your screens in 5 minutes
A backup of the affected table would be a wise move prior to making any of
the following changes!
By default most Matrix screens use absolute positioning, so when one screen
calls another, the new screen appears at a ‘random’ position (actually wherever
the configuration person happened to leave it last). It looks much smarter and
is less tiring on the eyes, when all screens ‘pop up’ exactly in the centre of
the previous screen. The configuration tools can naturally be used to perform
this task but you must edit every single screen – rather tedious. It is easier
to use your database tools to open table ‘DialogTemplates’, display all records
whose ‘ControlType’ = ‘TITLE’ and change the ‘Option1’ field from 1 to 0. Update
all of the screens in about 5 minutes. An SQL command could obviously be used to
do this also:
UPDATE DialogTemplates SET Option1 = 0 WHERE ControlType = 'TITLE'
| DialogName | ControlType | Option1 |
| ScreenName | TITLE | 0 |
While you are in this table it is also very easy to change the font of all screens from that boring Arial to Comic Sans and perhaps try a font size of 15 rather than the more usual 16. Careful though because if you decide to increase the font size rather than reduce it, the List Tab stops in list boxes could be compromised. Reducing the font size should not be a problem.
| DialogName | ControlType | Height | LabelText |
| ScreenName | FONT | 15 | Comic Sans MS |
Brighten up your Screens
Add a splash of colour to your favourite screens. I’m not saying that the
example below is perfect but it illustrates the idea. Here a small bitmap called
‘gbwash.bmp’:
![]()
- has been expanded to fill the screen and been given a security level of 500.
This security level forces the bitmap to become a background, leaving all of the
controls visible.
 Click the thumbnail to see a larger picture.
A new window will be opened. (60k)
Click the thumbnail to see a larger picture.
A new window will be opened. (60k)
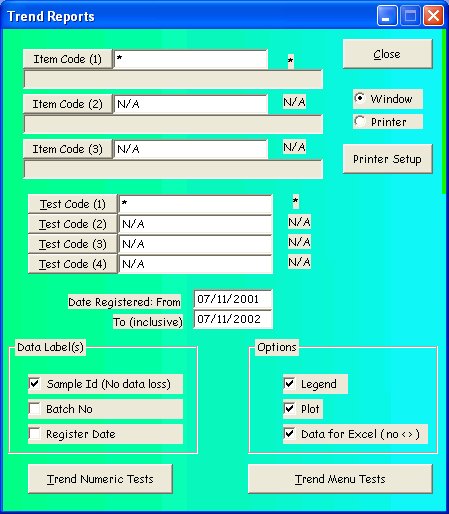
Let your Users Decide what a Report Contains
This Crystal report screen also demonstrates the passing of ‘flags’ to a
report, allowing the user to suppress sections or fields in the report if they
check or uncheck the appropriate boxes. The ‘Plot’ check box is control id ‘625’
(a user defined control). The report has an empty formula called ‘ID625’ and the
section of the report which contains the plot has a conditional suppress:
{@ID625} = 'FALSE'
If the user unchecks the plot box, the plot is suppressed because ID625 contains
the piece of text ‘FALSE’.
Formulas within the report can also act on the
contents of controls like this. The ‘Data Labels’ section of the screen is used
to allow the user to select how a sample is identified in the report. The sample
identification is constructed by a formula which adds database fields to a
string:
stringVar sample_id := '';
// Check {Samples.SampleText4} to see if it is null
stringVar st4 := ' ';
if IsNull ({Samples.SampleText4}) then st4 := 'NA' + Space (10) else st4 :=
{Samples.SampleText4} + Space (10);
//
if {@ID645} = 'TRUE' then sample_id := sample_id + Left ({Samples.SampleCode},
8) + ' ';
if {@ID646} = 'TRUE' then sample_id := sample_id + {@Date Sampled as Text} + '
';
if {@ID647} = 'TRUE' then sample_id := sample_id + Left (st4, 10);
//
sample_id;
Last updated Nov. 2002